Table of Contents
This post has been updated for the Next.js 13/14/15
appdirectory.
If you’re looking for a way to add Google Adsense to your NextJs blog, you may be having trouble getting it to work. I’ve encountered many problems myself, and sometimes even when you follow all the rules, your application can be rejected because Google didn’t notice you had added the Adsense script to your website.
Today I’m going to explain how to add Google AdSense to your Next.js blog. Not just explaining, I’ll show you the method I’ve used on my blog, focussed on performance and smoothness, so your website won’t be slow, laggy, or annoying (for a better user experience).
First things first, Now I’ll show you how to add Adsense to your NextJs blog, & then I want to share some of my thoughts about Adsense. These might be helpful for you.
A two-step process for adding AdSense
I’ll cover two steps. Both are required. or If you don’t make any mistakes, you could still be rejected.
Add the AdSense script before approval
To add Adsense script tag to your _document.tsx or _app.tsx page, first add the environment variable NEXT_PUBLIC_GOOGLE_ADSENSE=ca-pub-************ for Adsense ads which defines your AdSense id or Adsense code, then add the script. You can skip this step if you’ve already been approved for Adsense.
<script
  async
  src={`https://pagead2.googlesyndication.com/pagead/js/adsbygoogle.js?client=${process.env.NEXT_PUBLIC_GOOGLE_ADSENSE}`}
  crossOrigin="anonymous"
/>
and keep waiting until you get an e-mail from Google. It might take up to 3 weeks.
Don’t use any script components here. Because I even got rejected many times for this.
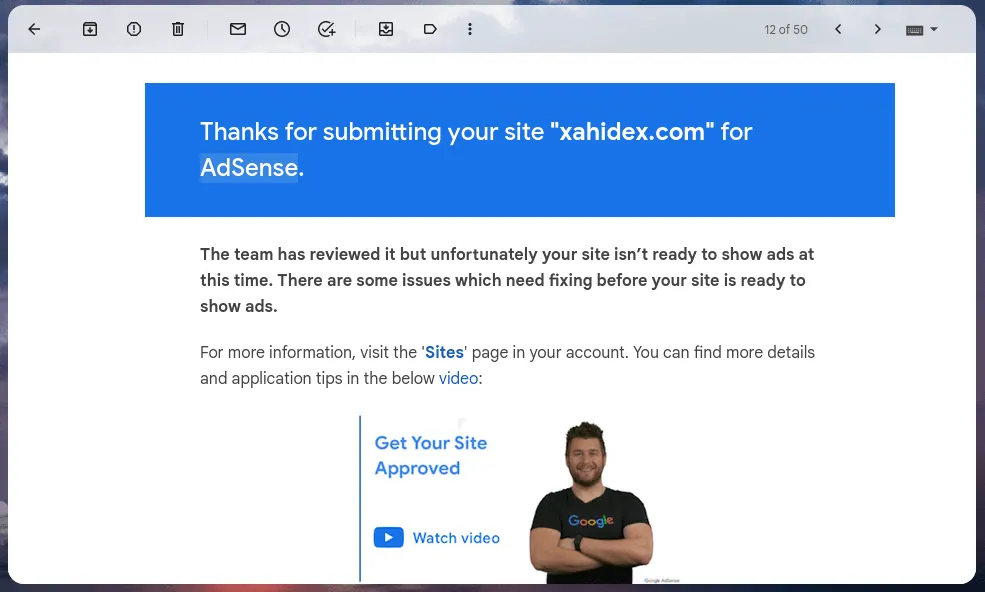
& Remember, If you get rejected, It’ll not be for the script. You’ll get rejected for reasons related to your blog or content. You’ll get an email like this
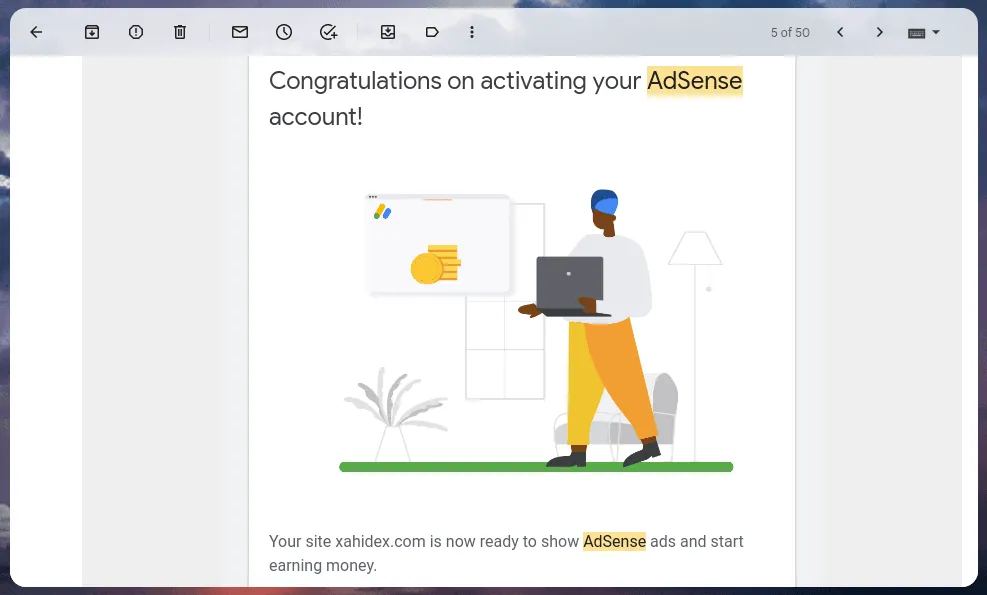
& you’ll get an email like this if you get approval
Add AdSense script after approval
In my opinion, this is the best method, Because we all focus on user experience. I’ll also mention two methods for this.
- Auto Ads (Recommended for effortless use)
- Custom Ads (Optimal for Enhanced Performance)
Method for auto ads with AdSense
add this script to your _document.tsx page:
import Document, { Head, Html, Main, NextScript } from 'next/document'
import Script from "next/script";

export default class MyDocument extends Document {
  render() {
    return (
      <Html lang='en'>
        <Head>
          <Script
            async
            src={`https://pagead2.googlesyndication.com/pagead/js/adsbygoogle.js?client=${process.env.NEXT_PUBLIC_GOOGLE_ADSENSE}`}
            strategy="lazyOnload"
            crossOrigin="anonymous"
          />
        </Head>
        <body>
          <Main />
          <NextScript />
        </body>
      </Html>
    )
  }
}
That’s enough. You can also use other script components. I’ve suggested lazyOnload because Vercel also suggested this one. And It’s a really good choice for performance.
Method for custom ads with AdSense
This is what I use on my blog. Auto ads can be annoying. I used to use Auto ads before.
add this simple script to your _document.tsx page:
import Document, { Head, Html, Main, NextScript } from 'next/document'
import Script from "next/script";

export default class MyDocument extends Document {
  render() {
    return (
      <Html lang='en'>
        <Head>
          <Script
            async
            src="https://pagead2.googlesyndication.com/pagead/js/adsbygoogle.js"
            strategy="afterInteractive"
          />
        </Head>
        <body>
          <Main />
          <NextScript />
        </body>
      </Html>
    )
  }
}
You can use other script components, but for non-auto ads,
afterInteractiveis the recommended choice.
Now you’re wondering how can you show ads, right? Because I didn’t include the AdSense client id in the script. Don’t worry. Follow these steps:
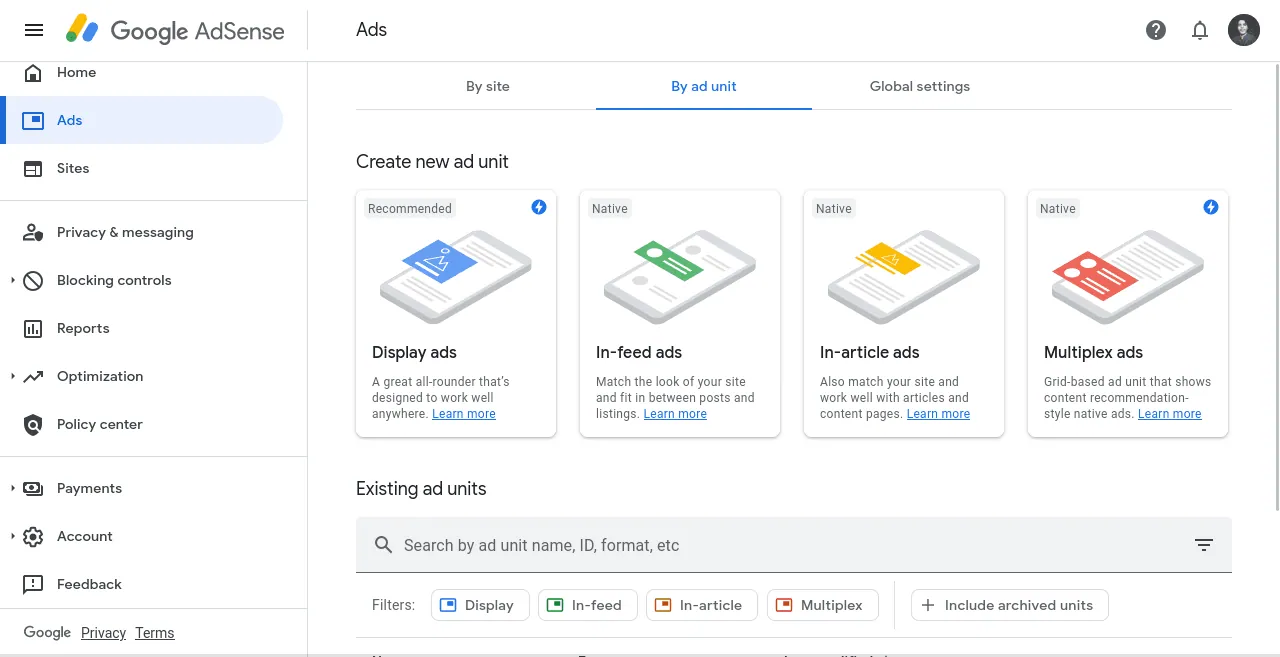
- Go to the Google Adsense dashboard
- Go to Ads
- Select
by ad unit - Now create an ad unit. whichever you like. I use in-article ads. So I chose it.
- Copy the slot id and you can save it somewhere, You’ll have to use it.
- add react-adsense package into your ‘package.json’
- Add this script wherever you want to show ads.
import React from 'react';
import {Adsense} from '@ctrl/react-adsense';

// ads with no set-up
<Adsense
  client="ca-pub-**********"
  slot="use-your-slot-id-here"
/>

// ads with custom format
<Adsense
  client="ca-pub-************"
  slot="use-your-slot-id-here"
  style={{ width: 500, height: 300 }}
  format=""
/>

// responsive and native ads
<Adsense
  client="ca-pub-************"
  slot="use-your-slot-id-here"
  style={{ display: 'block' }}
  layout="in-article"
  format="fluid"
/>
If you’re using mdx, then add this this code to MDXComponents. Or you can also use the component I’ve shown below And always remember, You can define your ad size.
Setup AdSense for the NextJs app directory
Yeah, I’ve been moved to NextJs 13 app router long ago. and I really loved this new router. So If you’re also using App router, You can easily migrate your Adsense as well.
It’s super easy. Just add the script to app/layout.tsx, Just like this:
import Script from "next/script";

export default function RootLayout({
  children,
}: {
  children: React.ReactNode;
}) {
  return (
    <html
      lang="en"
    >
      <body className="antialiased">
        <main className="flex-auto">
          {children}
          <Script
            async
            src="https://pagead2.googlesyndication.com/pagead/js/adsbygoogle.js"
            strategy="afterInteractive"
          />
        </main>
      </body>
    </html>
  );
}
and Add this component to your wherever you want to show Ads,
for example, MDXComponent.
'use client';

import { Adsense } from '@ctrl/react-adsense';

export default function ShowAd() {
  return (
    <Adsense
      client="ca-pub-1234567891011"
      slot="123456789"
      style={{ display: 'block' }}
      layout="in-article"
      format="fluid"
    />
);
}
If you’re using Auto Ads, you don’t need this. Just adding this code to your
app/layout.tsxis enough.
Now I’ll talk about my experience of getting Adsense approval.
Tips for writing quality content for AdSense approval
Make sure you’re writing unique content. Don’t ever copy-paste other’ writing until you’re smart enough. And also these include pages for a better chance:
- Copyright Page: Detailing information about copyright.
- Privacy and Policy Page: Describing the type of information collected and privacy practices.
- Disclaimer Page: Optional but can be included if relevant to your content.
Remember that, If your contents are not unique or you just copied others, There is a high chance of getting rejected.
I think that’s enough for this blog. Feel free to contact me if you need any help.
Best practices for integrating AdSense in NextJs
Here are some best practices to follow when integrating AdSense with Next.js:
- Use Responsive Ad Units: Ensure ads adapt to different screen sizes for an optimal user experience.
- Strategic Placement: Position ads in visible and relevant areas like above the fold, within content, or in the sidebar.
- Avoid Ad Overload: Strike a balance; too many ads can negatively impact user experience and engagement.
- Regular Performance Monitoring: Keep tabs on ad performance and adjust your strategy for improved revenue and user satisfaction.
Conclusion and summary
Integrating AdSense with Next.js can be challenging, but it is a worthwhile investment for website owners looking to monetise their website and generate revenue. By following the steps outlined in this article and implementing best practices for AdSense integration, you can easily display ads on your Next.js website and generate significant revenue.
Common questions about AdSense
- Is AdSense the Best Ad Network for Next.js Websites?
- AdSense is a popular and reliable ad network, but you should also consider other ad networks that may better fit your website’s niche or audience.
- Can AdSense Be Used with a Static Site Generated by Next.js?
- Yes, you can use AdSense with a static site generated by Next.js by following the same steps outlined in this article.
- How Many Ad Units Can I Place on My Website?
- Google has specific policies regarding the number of Ad Units you can place on your website. It is recommended to follow their guidelines to avoid any penalties.
- Can I customise Ad Unit Design and Placement?
- Yes, you can customise the design and placement of your Ad Units to match your website’s look and feel and maximise revenue and user experience.
- How Long Does AdSense Approval Take?
- AdSense approval can take anywhere from a few days to several weeks, depending on the complexity of your website and the content. It is important to follow Google’s guidelines and policies to avoid any delays in the approval process. Can I use AdSense on a new website? Yes, AdSense can be used on new websites. However, the site must meet Google’s quality guidelines, featuring original content and a user-friendly design.
- Which type of website is best for AdSense?
- Content-rich websites like blogs, forums, and news sites are best for AdSense. They typically have high engagement and regular traffic, which are key for ad revenue.
- How do I make $100 a day on AdSense?
- To make $100 a day on AdSense, focus on creating high-quality content in a profitable niche, use SEO strategies to increase traffic, and optimise your website layout for ad placement.
- How much traffic do you need to make $100 day with AdSense?
- The traffic needed to make $100 a day with AdSense varies by niche and CPC but generally, a few thousand daily views with high user engagement and strategic ad placement are required.
- What is the minimum traffic for AdSense approval?
- For AdSense approval, there’s no minimum traffic requirement. However, a well-established site with regular content updates is more likely to be approved.
- How can I get Google AdSense fast?
- To get Google AdSense quickly, ensure your website adheres to AdSense policies, has quality content, a clean layout, and is easy to navigate. Apply once these criteria are met for a quicker approval process.
- How much AdSense pay for 1,000 views on website?
- AdSense earnings are not fixed for a specific number of views. Instead, it operates on a Cost Per Click (CPC) or Cost Per Thousand Impressions (CPM) model. It can be $0.5 – $3 per 1,000 views. The amount you earn depends on factors like ad clicks, content niche, and audience location. CPC earnings are generated when visitors click on ads, with rates varying. CPM earnings are based on every 1,000 ad impressions. The actual earnings are influenced by content quality, ad placement, and audience engagement. It’s important to check your AdSense account for detailed reports on earnings based on various metrics.